Creating and setting up a user
Create a new user in Fidoo
- Settings – People – Add user (top centre).
- Fill in all fields and select whether this is a user with/without access to the application.
- If you are using dynamic user management, select whether you want the user to be active or deactivated.
- Enter Add user.
Bulk import of users
- Section
Settings – People
. - Click on and select
Import user
. - Download and fill in the prepared sample file. Rules for importing users
- Click on
Select File
, find it on your computer and select
Import
.
Login details for users
Each new user will receive an activation email that is valid for 30 days. You can send a new activation email from the app at any time. If the option to forward the activation email does not appear in the app, the user’s account is already active.
- Settings – People – click on the person you want to send the email to.
- Click on the Send Activation Email link.
In case you send several activation emails in a row, the last one is always valid.
Super user - user settings in multiple companies
- Settings – People – Add user (top centre).
- Specify the email that the user uses to log in to the application and wait for uniqueness verification.
- Confirm with the Add user button.
The user has to approve (or reject) the assignment to another company in the received email with the title Fidoo - request for approval to add a user.
Approval settings
- Section
Settings – People
– click on the user you want to set up approval for. - Select the Approval tab (right side of screen) –
Individual settings
. - Select the approval option, approver from the list of users, and confirm with the Save Settings button.
Setting up a crowd
- Section
Settings – People
– click on the user you want to set up the shortcut for. - Select a tab
Advocate
(right side of the screen) –
Add Shortcut
. - Select a shortcut from the list of users, enter the time of the shortcut, and confirm with the
Set up
.
The elected representative will be informed about the substitution in the Note section.
Setting up notifications in a queue
- Section Settings – Company – Notifications.
- In the section Advance by scroll bar
to enable/disable sending notifications to the representative, and Save.
The settings for sending the "types" of notifications are controlled either by the settings at the company or by individual settings directly on the user (representative).
Frequently asked questions to users
Like the approver, the team manager has a visible Team Finance agenda (with the addition of cards and cash) and can see Teams in the settings. However, he cannot edit them.
In Team Finances, the manager can then find an overview of everything his team members have in their My Finances agenda. All their cards, expenses, cash and assignments. This gives him a complete overview of what’s going on in his team.
The user’s phone number can be changed by the Main Application Administrator.
- InSettings → People, select the user whose number you want to change.
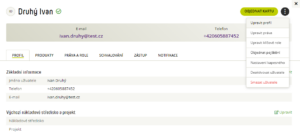
- On the right side of the screen, you will see the user detail and the Profile tab.
- Click on the green text Edit profile and a window will open where you can change the phone number.
The phone number is used to log in to the app and also for online payments as a security feature, so-called. 3D secure SMS.
The master administrator can change the user’s rights in the web application.
- InSettings → People, select theuser whose rights you want to override.
- On the right side of the screen, you will see the user detail and a button with three dots.
- When you click this button, a sheet appears, and you click Edit Rights.
- In this interface, you can see what rights can be set for the user and what actions the user will be able to perform with the appropriate rights settings.
- Select the rights package and save the selection.
To change or edit a user’s name, you need to re-identify the user. Settings – People – via select Identify User. In order to modify the identification, it is necessary to have all the user’s identification data.
A user without the app will not be able to use either the web or mobile app. However, he can use the Fidoo card in a limited mode (online payments cannot be processed).
A deactivated user will not be able to use the web or mobile app and cannot order a payment card. If he has the card, it will be locked and cannot be used during the deactivation period. There is no monthly fee for such a user.
Export Fidoo account
Creating a Fidoo account export
- Section Accounting agenda – Export Fidoo account.
- Select the period (top right) and enter Export.
- Fill in the name and select Create export.
Exports are cleared transactions that are locked when exported and cannot be exported again.
Download the Fidoo account export
- Section Accounting agenda – Export Fidoo account.
- Click on the export you want to download and type Download data.
Deleting a Fidoo account export
- Section Accounting agenda – Export Fidoo account.
- Click on the export you want to delete, type Delete and confirm with the Delete button.
When the export is deleted, the transactions are unlocked and can be exported again.
Cards
Ordering a personal card
- Settings – Cards – Order card (top centre).
- Select Personal Card and Order.
- Fill in the necessary details, select the delivery address and click on Order Card.
Order a team card
- Settings – Cards – Order card (top centre).
- Select Team Card and Order.
- Fill in the necessary details, select the delivery address and click on Order Card.
You can only cancel an order for any card on the day of ordering by permanently blocking the card and then sending us a refund request at info@fidoo.com.
Card settings
- Section Settings – Cards – select the card you want to set up.
- Click on
and select Edit Settings.
Recharging the card
- Manual – the user must send a request to recharge the card.
- Automatic – the card is automatically recharged to the specified amount when it falls below the specified threshold. Turning the option on/off also sets the limit for a given time period (week or month).
- Regular – the card will be topped up to a specified amount every week or month.
Allowed card transactions
- ATM withdrawals – prohibits/allows withdrawals from ATMs in the Czech Republic and abroad.
- Merchant payments – prohibits/enables merchant payments.
- Online payments – prohibits/enables online payments.
Restriction of payment card functionality
- For transport-related payments only – once activated, it limits merchant payments to only those associated with transport (toll gates, petrol stations, parking meters, etc.).
- Restrict card use to selected days only – once activated, you can tick the days you want the card to be used.
Setting up approvals on the team card
The approval setting on the team card overrides all other settings. This means that when a user swipes a team card, the approval of expenses follows the settings on the card. When ordering, the card is automatically set to approve at the company level.
Settings – Tabs
– tab
Approvals.
- Choose
Individual settings.
- Fill in the necessary fields and
Save
.
Fidoo Cards FAQ
If you wish to cancel the card you have just ordered, you can do so by blocking the card no later than 21:00 on the day you ordered it. This card will not go into production. Contact the Client Care Centre for a refund of the card production fee.
This is an auxiliary identifier that only appears in the application and the expense report. This element will not be embossed on the card and can be changed at any time. This is often the case, for example. employee number or vehicle registration number.
A card manager is a user who can pass a team card to another user in the application. At the same time, they can see in Team Finance → Cards → Transactions all the movements on the managed card and which person made the transaction. It can also charge/discharge, lock or block the card at any time and set its parameters
The card top-up approver approves or rejects top-up requests. The administrator can modify the card (charge/discharge it, change its settings, modify the automatic recharge scheme and limits). The cardholder is the only one who can physically handle the card – pay (even online) or view the PIN.
You cannot set a daily limit on the card within the app, it is determined by the amount loaded on the Fidoo card.
Top-up funds are on the card immediately after top-up (if you have sufficient funds in your Fidoo account). The withdrawal is made immediately back to your Fidoo account.
The card is usually shipped the next business day after ordering/renewal, delivery time is 5 – 7 business days. The card is sent by ordinary letter, the condition for delivery of the card is a properly marked mailbox of the recipient.
Troubleshooting
Transaction listing does not match
Fidoo only includes transactions that have cleared in the statement. It may therefore happen that a transaction made at the end of the month will be included in the following month’s statement. You can find these blocked transactions using the following filter:
- Section Corporate Finance – Cards – Transactions tab.
- Click Set up filter, select the period and check Blocked only or other parameters and enter Confirm filter.
Blocked transactions will appear in the list on the left side of the screen and you can download them using the button
Blocked transaction means money blocked on the card, i.e. waiting to be cleared by the merchant. The speed of payment settlement is determined, for example, by the merchant’s payment system settings, the amount the customer spends, or the type of terminal through which the payment is made. The amount may also change (for example, due to a change in the exchange rate). For this reason, we recommend that you do not account for these transactions and deal with them after they have been cleared by the merchant.
Travel guide
Filling in the logbook
When filling in the logbook, the application saves continuously, so there is no need to click the Save button, which is not found in this section.
- My Finance – Logbook – click on the vehicle whose logbook you want to fill in.
- Before you start filling in individual journeys for the first time, fill in the initial odometer reading at the beginning of the month. By filling in the runs one by one, you will be able to calculate the ending balance. If you also fill in the final status, the app will show you the number of kilometres you need to enter for the month.
- On the desired day, select the type of journey and fill in the mandatory fields for the journey: from where, to where, length in km, starting and ending odometer reading, journey time, break and purpose (in the case of a private journey, the last 2 fields do not need to be filled in).
- After filling in all the days in the month when the car was used, select Sign and Sign again.
Entering a reverse journey
- My Finance – Logbook – click on the vehicle whose logbook you will be filling in.
- Click on a ride to view its details – select Ride back.
- All mandatory fields are automatically filled in, the departure time is delayed by 1 hour after the arrival time.
Repeating the ride
- My Finance – Logbook – click on the vehicle whose logbook you will be filling in.
- Click on a ride to view its details – select Repeat Ride.
- In the calendar that appears, select the days when the trip was repeated and enter Repeat.
Deleting a ride
- My Finance – Logbook – click on the vehicle whose logbook you will be filling in.
- Click on a ride to view its details – select Delete.
Frequently asked questions about the Journey Book
In the BETA version it is possible to sign the logbook without all the necessary data required by law. Only distance or speedometer information is required. When signing the logbook, you will get a message that the logbook cannot be signed for some reason or that some journeys are not complete according to the government regulation. You can verify this information by clicking on the bulb which will be displayed next to the route of the incomplete journey, but even if you don’t correct the errors, you can sign the logbook.
Expenditure
Creating a VAT breakdown
- Section Settings – Expenses – VAT breakdown.
- Click on New VAT breakdown, add the name and abbreviation and Save.
Adjustment of VAT breakdown
- Section Settings – Expenses – VAT breakdown.
- Click on
and turn off/on the use of segmentation.
- Click on
, edit the name or abbreviation and Save.
Deleting the VAT breakdown
- Section Settings – Expenses – VAT breakdown.
- Click on
and select Delete VAT breakdown.
- Confirm with the Delete VAT breakdown button.
Creating a preconfiguration
- Section Settings – Expenses – Pre-accounting.
Manual settings
- Click on New preconfiguration.
- Fill in the name, code, usage and accounts and Save.
Importing a list of preconfigurations
- Click on Import preconfigurations.
- Download and fill in the prepared sample file.
- Click on Insert file, find it on your computer and select Import.
The MD/D code and accounts must be unique. If they are the same, the line will be overwritten by the last preconfiguration with the same code (the previous ones will not be imported).
Modifying pre-contraction
- Section Settings – Expenses – Pre-accounting.
- Click on
and turn off/on the use of preconfiguration.
- Click on
, edit and Save.
You can bulk edit the state of preconfigurations (active/inactive) by changing the "state" column in the import file and then importing again.
Deleting a preconfiguration
- Section Settings – Expenses – Prepayments.
- Click on
and select Delete Preconfiguration.
- Confirm with the Delete preconfirmation button.
Creating a cost centre
- Settings – Expenses – Cost centres.
Manual settings
- Click on New cost centre.
- Fill in the name and abbreviation and Save.
Import list of resorts
- Click Import resorts.
- Download and fill in the prepared sample file.
- Click Insert File, find the file on your computer and select Import.
The resort code must be unique. If the codes are the same, the line will be overwritten by the last name of the centre with the same code (the previous ones will not be imported). You can use the same code if you wish to change the status of a cost centre from active to inactive and vice versa.
Cost centre modification
- Settings – Expenses – Cost centres.
- Click on
and turn off/on the use of the cost centre.
- Click on
, edit the name or abbreviation and Save.
You can bulk edit the status of cost centres (active/inactive) by changing the "state" column in the import file and then importing again.
Deleting a cost centre
- Settings – Expenses – Cost centres.
- Click on
and select Delete.
- Confirm with the Delete Centre button.
Mandatory field settings
- Section Settings – Expenses – Required fields.
- Use the
button to turn off/on the obligation to add a specific expenditure.
If the user does not fill in the required fields, the application will not allow them to send the expense for further processing (approval or accounting closure).
Travel guide
Creating a logbook export
Identification before conclusion of the contract
What is identification?
Identification is the process by which we verify and record your identifying information for the purpose of entering into the Framework Agreement.
Why is identification necessary?
The obligation to identify our clients is imposed on us by Act No. 253/2008 Coll. (AML Law).
Who do we need to identify?
Identification must be made with each representative of the company who will sign the Framework Agreement, in the case of signature by a statutory representative or by proxy
What happens if we don’t make the identification?
Without identification, it is not possible to enter into a Framework Agreement with us and use the Fidoo services.
What is an identification payment?
This is one of the elements of remote identification that verifies the existence of a bank account.
Where do I find the details to send the identification payment?
This information will be provided to you during the booking process.
Methods of client identification
1. In person
- Identification will be made by Direct Fidoo at the conclusion of the Framework Agreement
What documents do you need for identification?
- completed Contract Documentation Form
- one identity card
- Verification of ownership of the company account (e.g. bank statement with transaction details blacked out)
What is the procedure?
- Arrange a personal meeting with our salesman
- During the meeting, the trader will make an identification and enter the identification data into the internal system
What do we check?
- According to the company’s ID number, we will find and record basic identification data of the legal entity such as: name, registered office and other information from a valid extract from the Commercial Register
- Identification of the natural person who acts on behalf of the legal entity when concluding the contract: name, surname, birth number, date and place of birth, permanent residence and nationality of the representatives authorised to act for the company
- We verify that the client’s appearance matches the image on the identity card
- We will verify and record the ID card number, when the ID card was issued and by whom (by which authority or state), and until when the ID card is valid
2. Mediated by
Identification is done through the so-called. A public document of identification, which you can send to us or give the original to our sales representative after it has been issued by an official. There is a fee for this service.
What do you need to take with you when you want to apply for a mediated identification?
- identity card
- extract from the Commercial Register
Institutions that can issue a Public Identification Document include:
- contact points of public administration – Czechpoint (Czech Post, regional offices, municipal offices, offices of municipal districts or city districts, but also embassies abroad) or
- Notaries
How can you deliver the charter to us?
- Hand the original to our sales representative or
- Send the original to Direct Fidoo a.s. Pod Dráhou 1636/1 Prague 7 – Holešovice 170 00 or
- At your request, the notary/contact point of the public administration will deliver the public deed including the annex to the Direct Fidoo data box (amq9upt)
The following information must be included in the document:
- which institution issues the public document
- at whose request the deed is executed – indicate the name of the company:
Direct Fidoo a.s.
- for what purpose the deed is executed – please specify:
conclusion of the Framework Agreement
- details of the identified person
- declaration of the identified person
- signature of the identified person, including date and place of signature
- attachments – a copy of the main identification document (ID card) must be included in the Public Deed
- the date, place and signature of the person who made the identification
3. Remote identification without physical presence
In order to make the contracting process as simple as possible for our clients, we offer the option of remote identification. Identification is completed upon receipt of the identification payment from the company bank account and presentation of two photo IDs.
For remote identification you need:
- a double-sided copy of the ID card of the managing director(s),
- a double-sided copy of another identification document (passport, driving licence) of the managing director(s),
- a printscreen or scan of the bank account statement that is held in your company’s name and that will be included in the Framework Agreement
- making an identification payment
What are identification documents?
1. Main identity document
An identification document is, for example, an identity card or passport.
Both the front and back of the document are required. A copy of the identification document must comply with the following requirements:
- the document must be valid on the date of signing the contract,
- the document must be in JPG, PNG, GIF or PDF format,
- one document maximum 10 MB
- the document must not be defaced by any watermark,
- the document must not have a cut corner
- the individual information, including the photograph, must be legible and clearly identifiable
- individual information must not be blurred or blackened,
Front side of the identification document
Back of the identification document
2. Supporting document
As a supporting document, Direct Fidoo accepts e.g. passport, driving licence, birth certificate, marriage certificate or insurance card, for example.
The same rules apply for these documents as for the main document.
3. Bank account statement
A copy of the bank statement must meet the requirements of an identification document and be up-to-date (no older than 3 months).
A copy of the statement must contain the following information:
- company name
- address
- bank account number
- banking institution
A copy of the statement may have the following information blacked out:
- Initial balance
- Final balance
- Individual transactions
Making an identification payment
You will receive instructions for making the identification payment as part of the contracting process.
In the event that the identification payment is not credited to our account within 5 working days of the conclusion of the Framework Agreement, this Agreement shall be null and void.
Fidoo API and its settings
The API is secured using a statically generated key that uses the permissions of the user whose Fidoo account it was generated under. Depending on the permission level of this user, the API key can be used for read-only or write/change data.
The ability to generate API keys is by default assigned to the user in the role of Main Administrator in Fidoo. If you want to grant this right to another user, you need to contact our Client Care Center and request activation of the key generation option.
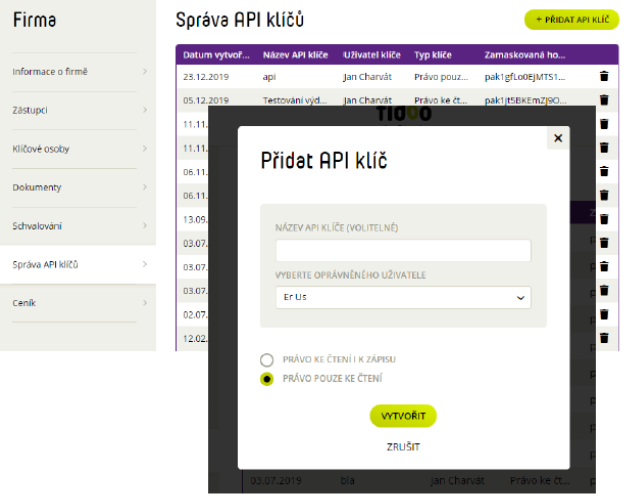
- The main administrator or a user with granted rights can see the section Settings → Company → API key management, where he can generate one or more API keys.
Fidoo API settings - The API key must be inserted into the X-Api-Key header in the queries being called.
Test data
If you are interested in a test environment, please contact our Client Care Center(info@fidoo.com). We will be happy to set up a Fidoo test environment that can communicate with the test API from the repository: https://api-preprod.fidoo.com/v2